
64 F100

-
slickmainer

- Posts: 2555
- Joined: October 8, 2007, 6:41 pm
- Location: Auburn Maine
- Contact:

Story is
I was bored 6 months ago and decided to teach myself how to weld...been meaning to for years. So I bough a junk utility trailer, a Lincoln 140 MIG and went to work. After a few months trl was looking fairly good and I decided I needed another project a little more challenging. I shopped long and hard for a early 60s Ranchero (dad had a 62 years ago) and as most of you know, finding any 60s era vehicle that hasn't been bastardized, etc, is quite the challenge.
The few I found locally were junk and I was not comfortable purchasing from on-line w/o inspection. I decided to start looking at early ford trucks which led me to this one.
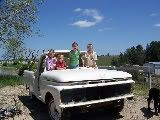
Found it about 60 miles from here and the kid who owned it had it priced fairly cheap. It has original motor/trans and all the trim (minus the bed side trim), dash was not cut into and, again, it was inexpensive:)
I drove it home (or it drove me), took both lanes to keep it on the road as the steering was bad......Braking was on the verge of dangerous as it pulled to the right hard!!! After tearing it down I found out why...left front brake line was pinched between frame and steering box....pinched shut! No braking on the left front!
At any rate, I tore it down to the frame and then felt very overwhelmed with the project at this point....where to go from here. I have truck pieces in bags/boxes all over the garage, on cemet blocks in the backyard, body parts in the shed attic and the cab on an old harbor freight trailer in the back.
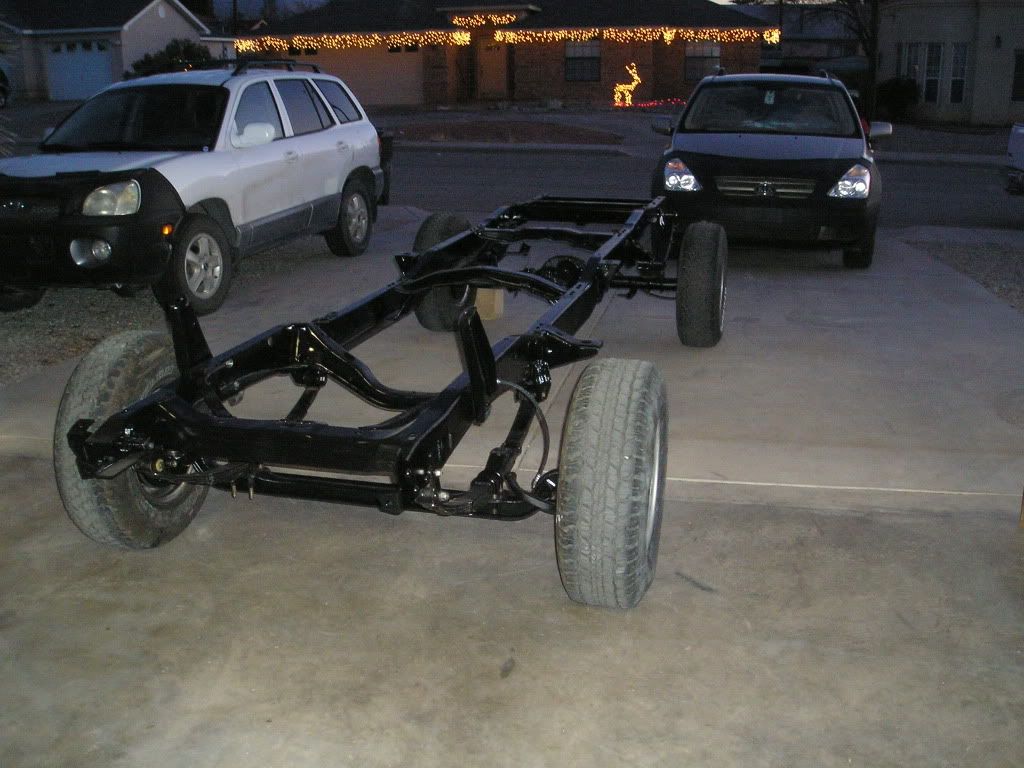
After taking a breather I decided to get the frame sand blasted/painted and then start putting stuff back on as I clean/inspect/repair/replace.
So that's where I'm at now, frame is freshly painted and setting on blocks in the garage, front/rear axles cleaned/painted inspected and currently waiting front end parts in the mail to put back together.
If I started this over I would keep the truck together and do it in small bits but.....too late for that.
Once I get the front and rear axle/ steering components on the frame then I plan to move onto cab rust repair
A few of you have already answered some questions I posted directly on here concerning my heat exchanger for trany cooler but a whole bunch of you have answered my questions indirectly as I've been reading this forum quite a bit in the last month.
I'll keep this post updated with my progress and I'm sure I'll keep the question coming:)
thanks for the past and future help.
Pictures in my profile
[/img]
The few I found locally were junk and I was not comfortable purchasing from on-line w/o inspection. I decided to start looking at early ford trucks which led me to this one.
Found it about 60 miles from here and the kid who owned it had it priced fairly cheap. It has original motor/trans and all the trim (minus the bed side trim), dash was not cut into and, again, it was inexpensive:)
I drove it home (or it drove me), took both lanes to keep it on the road as the steering was bad......Braking was on the verge of dangerous as it pulled to the right hard!!! After tearing it down I found out why...left front brake line was pinched between frame and steering box....pinched shut! No braking on the left front!
At any rate, I tore it down to the frame and then felt very overwhelmed with the project at this point....where to go from here. I have truck pieces in bags/boxes all over the garage, on cemet blocks in the backyard, body parts in the shed attic and the cab on an old harbor freight trailer in the back.
After taking a breather I decided to get the frame sand blasted/painted and then start putting stuff back on as I clean/inspect/repair/replace.
So that's where I'm at now, frame is freshly painted and setting on blocks in the garage, front/rear axles cleaned/painted inspected and currently waiting front end parts in the mail to put back together.
If I started this over I would keep the truck together and do it in small bits but.....too late for that.
Once I get the front and rear axle/ steering components on the frame then I plan to move onto cab rust repair
A few of you have already answered some questions I posted directly on here concerning my heat exchanger for trany cooler but a whole bunch of you have answered my questions indirectly as I've been reading this forum quite a bit in the last month.
I'll keep this post updated with my progress and I'm sure I'll keep the question coming:)
thanks for the past and future help.
Pictures in my profile
[/img]
A little progress.
Removed, cleaned, inspected and reassembled the kingpins this week. They ended up being good, so I cleaned, replaced the grease fittings and reassembled...stuck the king pins in the freezer for a few hours and then they slipped right in and gave me time to align the pins easily.
First experience with National Parts Depot. Ordered new bushing for the rear springs a few weeks ago, received the wrong size. called and they explained those were the ones for my year truck. I explained that maybe so but they are too small. Shipped the old ones back and gave them the exact size (1&1/8 X 2&1/4) that I needed. They sent me 1&1/4 X 2&1/2 this time. I'll half to call Monday and start all over again. Frustrating as I can't get anything back on the frame right now. My front springs are being reconditioned and I need the bushing for the rear.
I did receive the 1in tie rod and ends from Obsolete this week. My old one was bent up...I was going to straighten and use but the 1in tierod and ends was not much more then two ends...so I went with it.
Decided to take a look at my cab and figure out if I need/want to order panels or just try and make the parts.

After looking, I think I'll order the cab mounts (DC?) and just get some 18 ga steel to repair the rest...any thoughts?


Removed, cleaned, inspected and reassembled the kingpins this week. They ended up being good, so I cleaned, replaced the grease fittings and reassembled...stuck the king pins in the freezer for a few hours and then they slipped right in and gave me time to align the pins easily.
First experience with National Parts Depot. Ordered new bushing for the rear springs a few weeks ago, received the wrong size. called and they explained those were the ones for my year truck. I explained that maybe so but they are too small. Shipped the old ones back and gave them the exact size (1&1/8 X 2&1/4) that I needed. They sent me 1&1/4 X 2&1/2 this time. I'll half to call Monday and start all over again. Frustrating as I can't get anything back on the frame right now. My front springs are being reconditioned and I need the bushing for the rear.
I did receive the 1in tie rod and ends from Obsolete this week. My old one was bent up...I was going to straighten and use but the 1in tierod and ends was not much more then two ends...so I went with it.
Decided to take a look at my cab and figure out if I need/want to order panels or just try and make the parts.
After looking, I think I'll order the cab mounts (DC?) and just get some 18 ga steel to repair the rest...any thoughts?
-
64shortbed
- Posts: 291
- Joined: April 15, 2010, 12:25 am
- Location: Paso Robles, Ca
I've been meaning to teach myself to weld for years but haven't dont it yet. I admire those who have. I can't speak to your welding issues, but for parts, I have used Concours Parts in Nevada and recently tried Antique Auto Parts Cellar in Massachesetts. I have had good experiences with both. Dennis Carpenter and MACS have been good to me too.
-don
'64 F100 262-I6
'64 F100 262-I6
Thanks for the info on vendors, I knew about Macs but had not heard of the other two....always good to have choices when you need parts. I ended up ordering from Caroline Classics; Cab supports, Cab corners and I went ahead and ordered Floor pans. I don't need much of the floor pans but figured I can use the portions I don't need in the floor as materiel for the front cab pillars I need to repair.
Teaching myself to weld was enjoyable and I wish I had done it years ago. Welding on body panels will be more difficult then what I've done so far, but then that was the point of picking up an old truck that needed fixin.
Here's before and after pics of the trailer:


I since added front and rear railing but haven't taken new pics lately.
Teaching myself to weld was enjoyable and I wish I had done it years ago. Welding on body panels will be more difficult then what I've done so far, but then that was the point of picking up an old truck that needed fixin.
Here's before and after pics of the trailer:
I since added front and rear railing but haven't taken new pics lately.
-
unibody madness

- Posts: 2147
- Joined: December 4, 2008, 4:33 pm
- Location: Paradise,CALIFORNIA 95969
Great looking work and welcome.
I just found the post, and think what you are doing is awesome.
You might also consider Toms flashback f100s and Dennis Carpenters Tom is a member here and has a great reputation. Dennis has alot of hard to find parts,some made from original molds.
I just found the post, and think what you are doing is awesome.
You might also consider Toms flashback f100s and Dennis Carpenters Tom is a member here and has a great reputation. Dennis has alot of hard to find parts,some made from original molds.
Turk build thread at:
http://slick60s.com/viewtopic.php?f=32&t=18944
It does not matter what you think, it only matters what you do about it!
http://slick60s.com/viewtopic.php?f=32&t=18944
It does not matter what you think, it only matters what you do about it!
-
castruck_1964
- Posts: 643
- Joined: August 3, 2006, 3:45 pm
- Location: Ramara Ontario

Been a busy winter so far with not much time spent on the slick...life is rough when the choices are sittin' in a duck blind, chasing quail or tinkering w/a truck '8)'. Iv'e been cleaning & painting here and there, but was able to spend the whole weekend putting things back together. Goal was to get the springs, axles, brakes/hubs and rolling gear put back on. Nice to finish up the weekend w/goal met.
After dissembling, cleaning, sand blasting or stripping rust via wire wheel, I used Rustoleum rust converter as a primer with rustoleum Satin Black (7777) over that. I did have Ace Springs in San Antonio, TX reconditioned the front springs as they were drooping quite a bit.


After trying Simple Green, Power purple, CARB Dip & paint thinner as cleaning solvents, I've come to the conclusion that Dawn dish soap and elbow grease work as good as anything else.
After dissembling, cleaning, sand blasting or stripping rust via wire wheel, I used Rustoleum rust converter as a primer with rustoleum Satin Black (7777) over that. I did have Ace Springs in San Antonio, TX reconditioned the front springs as they were drooping quite a bit.
After trying Simple Green, Power purple, CARB Dip & paint thinner as cleaning solvents, I've come to the conclusion that Dawn dish soap and elbow grease work as good as anything else.
Re: 64 F100
Been busy with family during the holidays but I did get a little done on the '64 in the last few days.
Last week my daughter and I were able to get the cab onto the dolly and positioned in the garage for rust repair:

Yesterday I spent a little time cleaning up the bottom and found my mid-cab support ends full of dirt which created some rust.

need to replace this small section of step:


Rust cut out:

New patch panel cut:

Tacked in place:

More tack welds:

Completely welded in:

back of panel: I did go ahead and weld up this side as well after I took this shot as I wasn't happy with some of the penetration.

After grinding/sanding:

A few notes:
Harbor Freight spot-weld cutter worked great, I cut about 12 spot-welds out and one side of the cutter is worn out, but that's better then I expected from the $4 tool.
Slow & patience are key to panel welds. I did blow thru twice, but both times was due to me trying to do more & keeping the arc on the work to long.
All in all I'm fairly happy w/my first panel repair. I need to fabricate the support piece I cut out and weld it in next.
Ken
Last week my daughter and I were able to get the cab onto the dolly and positioned in the garage for rust repair:
Yesterday I spent a little time cleaning up the bottom and found my mid-cab support ends full of dirt which created some rust.
need to replace this small section of step:
Rust cut out:
New patch panel cut:
Tacked in place:
More tack welds:
Completely welded in:
back of panel: I did go ahead and weld up this side as well after I took this shot as I wasn't happy with some of the penetration.
After grinding/sanding:
A few notes:
Harbor Freight spot-weld cutter worked great, I cut about 12 spot-welds out and one side of the cutter is worn out, but that's better then I expected from the $4 tool.
Slow & patience are key to panel welds. I did blow thru twice, but both times was due to me trying to do more & keeping the arc on the work to long.
All in all I'm fairly happy w/my first panel repair. I need to fabricate the support piece I cut out and weld it in next.
Ken
Re: 64 F100
Got back on the '64 today. Fabricated the support piece for the left side and welded it in:


Took a hard look at the Right side and it had rust there as well, not quite as bad as the left side but still needed the same repair. Here's a few shots, mostly after the work was done as I forgot the before pictures:)
Front side after welding:

Back side after welding:

I was able to save the piece of the cross member I cut out and re-use it after putting the patch in:

Front side after grinder work:

I think I'm ready to tackle the front cab corners now, just waiting on the lower piller panels from CC, which should be here this week.
Ken
Took a hard look at the Right side and it had rust there as well, not quite as bad as the left side but still needed the same repair. Here's a few shots, mostly after the work was done as I forgot the before pictures:)
Front side after welding:
Back side after welding:
I was able to save the piece of the cross member I cut out and re-use it after putting the patch in:
Front side after grinder work:
I think I'm ready to tackle the front cab corners now, just waiting on the lower piller panels from CC, which should be here this week.
Ken

Re: 64 F100
Ken, The patches look great. I remember doing all the patch panels in mine and it wasn't bad at all.
Kevin
Kevin
kstones63
_______________________________________
63 F100
29 Ford Sedan Delivery
99 F250 PSD, 4x4, CC
95 F350 Flatbed Dually Diesel
_______________________________________
63 F100
29 Ford Sedan Delivery
99 F250 PSD, 4x4, CC
95 F350 Flatbed Dually Diesel
Re: 64 F100
Thanks Kevin. Hasn't been as hard as I thought it might be. Hard part is taking my time, I'm a get-it-done, Lets-see-some-results type, so detail work is not my strong suit...maybe this old truck will teach me some patience.
Ken
Ken
Re: 64 F100
Some tough stuff you are taking on. Looks great so far though.
Are you using a tig welder or a wire feed for your welds?
Also, did you make the supports, or buy them?
J
[ Post made via iPad ]
Are you using a tig welder or a wire feed for your welds?
Also, did you make the supports, or buy them?
J
[ Post made via iPad ]
1964 F100, 292ci
1963 Buick Wildcat, 401ci
They just don't make them like they used to.
1963 Buick Wildcat, 401ci
They just don't make them like they used to.
Re: 64 F100
MIG, Lincoln Electric 140, using .025 L56 wire and 75/25% argon/co2 mix.
As for the supports, if you mean the mid cab floor support that I replaced in the above photo's, I just fabricated the end I cut off out of some scrap steel. Used the bench vice to bend.
As for the front cab supports I have yet to do, I bought them from Carolina Classic's along with floor pans and lower door pillar panels.
Here's a shot of the left side that I hope to tackle in the next few weeks.

Tough to spend my winter weekends on the cab when I have this guy setting next to me, staring at me with his "I'm-not-retrieving-birds-look"....

And he'd much rather being chasing quail:

or Ducks...

Not to mention, as much as I'm enjoying working on the slick, I'd rather be driving it to the duck blind
Ken
As for the supports, if you mean the mid cab floor support that I replaced in the above photo's, I just fabricated the end I cut off out of some scrap steel. Used the bench vice to bend.
As for the front cab supports I have yet to do, I bought them from Carolina Classic's along with floor pans and lower door pillar panels.
Here's a shot of the left side that I hope to tackle in the next few weeks.
Tough to spend my winter weekends on the cab when I have this guy setting next to me, staring at me with his "I'm-not-retrieving-birds-look"....
And he'd much rather being chasing quail:
or Ducks...
Not to mention, as much as I'm enjoying working on the slick, I'd rather be driving it to the duck blind
Ken

Re: 64 F100
Good work Ken! I've done pretty much the exact same to my 64 including both front pans. Good welder too, I have the SP135 and love it. You can dial it down real low and run continuous beads on the 16 ga. stuff without warping a thing.
"If you don't want to stand behind our Troops, feel free to stand in front of them."
1964 Ford F100
1967 US Army M416
1964 Ford F100
1967 US Army M416
Re: 64 F100
That's some pretty good fabricating.
And a really good welder. I wish I could do that with my welder. I have it down past the lowest setting and I still burn through when doing some of my spot welds.
[ Post made via iPad ]
And a really good welder. I wish I could do that with my welder. I have it down past the lowest setting and I still burn through when doing some of my spot welds.
[ Post made via iPad ]
1964 F100, 292ci
1963 Buick Wildcat, 401ci
They just don't make them like they used to.
1963 Buick Wildcat, 401ci
They just don't make them like they used to.
Re: 64 F100
Thanks for the kind words Max & Rusted64. A little more progress. I got the left side lower cab pillar drilled and rust cut out earlier this week.

Started by welding in the lower kick panel side piece and lower part of the inner cab pillar support that was rusted out

Also got the rusted part of the floor pan cut out and replaced

Finished up today by fabricating the lower pillar support piece


Still have some final trimming and sandblasting to do before I weld it in place
I marked the location of the cab-support hole with a few line-up lines on the floor, but still concerned about getting the cab support in the right location with the cab setting on it's back. At first I thought about just measuring the cab mount holes on the frame and triangulating and making sure the supports on the cab were in the right place....after considering that, I figured the best way to make sure is to put the cab back on top of the frame and line everything up before I weld it in place. For those that have done this already, how did you do it?
Thanks for looking guys,
Ken
http://s1223.photobucket.com/albums/dd519/ken462/
Started by welding in the lower kick panel side piece and lower part of the inner cab pillar support that was rusted out
Also got the rusted part of the floor pan cut out and replaced
Finished up today by fabricating the lower pillar support piece
Still have some final trimming and sandblasting to do before I weld it in place
I marked the location of the cab-support hole with a few line-up lines on the floor, but still concerned about getting the cab support in the right location with the cab setting on it's back. At first I thought about just measuring the cab mount holes on the frame and triangulating and making sure the supports on the cab were in the right place....after considering that, I figured the best way to make sure is to put the cab back on top of the frame and line everything up before I weld it in place. For those that have done this already, how did you do it?
Thanks for looking guys,
Ken
http://s1223.photobucket.com/albums/dd519/ken462/
Re: 64 F100
Looks good ken. Working on the same thing.