
Rusty 63 F100 + 04 CV PI


Bye, Bye Crown Vicky!
Kissed the CV goodbye today! Oh what fun. We finished cutting a few bits off the frame (e-brake cable bracket, rear shock brackets) and then dropped it down onto my skates. Talk about a LOW RIDER!!!


Remember when I said the hitch was twisted all the way down from 3 to 6? Check it out - the rear of the car is sitting on the receiver hitch on the skate! LOL

Now's where I got creative, and most (including me) will say "stupid". We bolted a chain down to the rear seat belt mounts, then used the HF engine hoist/cherry picker to lift the car up & roll it over the trailer & dropped it into position. If only it was as easy as that description sounds! LOL
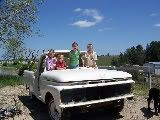
Here's Dad acting likes he's man-handling the car single-handedly.

Slide it in, nice & easy...

Snug as a bug in a rug

At the scrap yard

Bye bye, Vicky!

Next up - road trip!! Ugh - 258 miles each way to go check out the donor - hope it's worth the gas & our time!
Remember when I said the hitch was twisted all the way down from 3 to 6? Check it out - the rear of the car is sitting on the receiver hitch on the skate! LOL
Now's where I got creative, and most (including me) will say "stupid". We bolted a chain down to the rear seat belt mounts, then used the HF engine hoist/cherry picker to lift the car up & roll it over the trailer & dropped it into position. If only it was as easy as that description sounds! LOL
Here's Dad acting likes he's man-handling the car single-handedly.
Slide it in, nice & easy...
Snug as a bug in a rug
At the scrap yard
Bye bye, Vicky!
Next up - road trip!! Ugh - 258 miles each way to go check out the donor - hope it's worth the gas & our time!
Waste of time
Just got back from a 540 mile round trip goose-chase. I called yesterday to get teh address. He gave me his home address - miles from where the truck was. So I called from his house saying "We're here - where are you & the truck?" at which point we were given directions to a dirt drive off a side street -- I swear I heard "dueling banjos" as we drove through a hole in the trees smaller than a garage door. After 1/4 mile of wilderness, we came upon a trailer in a "clearing" littered with the bones of countless stripped cars. In front of the trailer is the truck in the above pictures - the rear of the frame hanging from a chain around a home-made boom attached to what appeared to be a nearly new fork lift. (??) The rear axle nowhere to be seen, and the rims replaced with mismatched steelies & deeply cracked tires. The guy turned out to be nice enough - but in discussion we learned he "used to run a junkyard" and "knows what these trucks are worth". Fan-fooking-tastic. $800 FIRM as it "hangs".
Let me tell you about it. The dash was the nicest thing on the truck & truth be told is true to the above picture - nice. Oh, and the "step" area on the driver's side was indeed pristine. The passenger's likely was before some bozo apparently used a bottle jack to lift the truck by the underside of the step. Great. What else? The "rust free" kick panels had peeling out bondo that'd been primered over to blend it all in. The floor pans had 1/4" rust holes all over -- like a dozen per side. The cab mount bolts weren't even touching metal since there wasn't any metal for them to touch. The grille, which looks great in the photo, in person is a pretzel. The hood & radiator support have only surface rust, ok, not bad. Drivers fender - dented, but yes, rust free - on top. Heavy-scaly underneath. Drivers door - tweaked, ill fitting, someone felt the need to cut the leading edge to stop it from continuing to hit the cowl. The cab corners had rust through. The back of the cab had 3 fist sized dents. The passenger side is a disaster. Starting from the bumper that is MUCH worse in person, the fender is wasted, the door is pushed in all across the lower 3rd, and there's a boot-sized punch dent in the door right where the body line drops. And there's a dent in that body line in the B pillar. Look up - "Oh yea, a tree branch fell on it - hazard of being i the woods". Yup - a double crease in the roof over the B pillar, right across the roof body line. Looks like the branch hammered the drip rail against the roof too.
We asked if he was negotiable on the price - thinking that as screwed up as it is, it is still better than what we've got now - he responds that the "very rare door pocket" (that doesn't unzip, mind you, is dry rotted to heck, and has completely wasted plastic trim) is "worth over a hundred dollars", and that if we didn't want it he was "going to put in on the short frame over there and sell it for double that".
"You mean the 65-66 frame I saw over there?"
"Yeah, that's it - 65 was the first year for the - uh"...
"Twin I Beam suspension?"
"Yeah, that's it".
Right. Idiot. It won't fit anyway. But looking around, I decide not to tell him he's an idiot.
I figure the cab is worth $250 to me (it needs pans, cab corners, doors, hinges, possibly mounts, and a half dozen dents fixed), and the radiator support maybe $50. No rust through visible, but it's scaly. Maybe I could sell off the grille & hood. Fine - I offered him $500. He refused & wouldn't even counter. $800 or leave it was his attitude.
We left it.
Time for a beer!
-
64shortbed
- Posts: 291
- Joined: April 15, 2010, 12:25 am
- Location: Paso Robles, Ca
-
ezernut9mm

- Posts: 9141
- Joined: July 21, 2006, 9:37 pm
- Location: KCMO

man, i'll bet that was disappointing. that truck looked pretty good in the pics.
always
"i believe i've achieved satisfaction".-bubbles
"should i be gettin" baked for this boys?"-bubbles
i could no longer keep "r.i.p.ing" all of our fallen brothers and sisters, so i say here, slick loads of love and much respect to all you beautiful people.
"i believe i've achieved satisfaction".-bubbles
"should i be gettin" baked for this boys?"-bubbles
i could no longer keep "r.i.p.ing" all of our fallen brothers and sisters, so i say here, slick loads of love and much respect to all you beautiful people.
-
Thunderboy
- Posts: 335
- Joined: August 26, 2008, 2:24 pm
- Location: Sacramento, California
Made some minor progress today (been busy lately, so little garage time...) finished removing the old engine stand towers that the PO had fabricated, straightened out the lips on the frame rail, then got the frame marked for the pin holes - I went 3/4" from the front of the bumpstop hole (which is ~1" from the center of the bumpstop hole). Then went to get the drill & realized my stupid bit set doesn't have a 3/4" bit.
Pop is going to run to Sears anyway, so I gave him a little shopping list (including the 1-3/4" holesaw to cut the support tubes out of the CV frame rail stubs, the 1-1/4" holesaw to cut the holes to get the tubes into the frame rails (that'll be next), and a few ratchets to swap out (gotta love that about Craftsman tools).
Hopefully more progress tomorrow!
Finally got some progress made today...
So here's where we are: I put the straight axle back in & used it to mark my axle center line on the top of the frame rail, then took it back out again. I measured off any & all reference points I could find, and then center punched the axle CL on the frame rail. I wrapped a piece of twine from the inside of one rail, up & over the axle marks, down the outside, under the frame, up the outside of the other rail & up & over the marks. In this way I (hopefully) transferred the axle center line to the underside of the rails. After reading a bunch of threads, I noted that it seems most guys on the 61-64's place the "pins" 3/4" to 1" ahead of the bump stop holes. So I measure forward from the string & made marks. Measuring the pins on the cross member, they're 31-1/2" on center. The rails measure 34" outside to outside, so I made cross marks 1-1/4" in from each side. I measured several times, then center punched & pilot-drilled the holes. After a few tool malfunctions with my holes saw (don't ask), I managed to get both pin holes drilled. Rolled the cross member under the rails, & jacked it up into place. Whaddayaknow? The pins popped right into position. I love it when a plan comes together. Enjoy the pics... hopefully tomorrow I can get the tubes in position...


From what I can tell, with the engine & body back on, it should droop about another 2"... Nice!
So here's where we are: I put the straight axle back in & used it to mark my axle center line on the top of the frame rail, then took it back out again. I measured off any & all reference points I could find, and then center punched the axle CL on the frame rail. I wrapped a piece of twine from the inside of one rail, up & over the axle marks, down the outside, under the frame, up the outside of the other rail & up & over the marks. In this way I (hopefully) transferred the axle center line to the underside of the rails. After reading a bunch of threads, I noted that it seems most guys on the 61-64's place the "pins" 3/4" to 1" ahead of the bump stop holes. So I measure forward from the string & made marks. Measuring the pins on the cross member, they're 31-1/2" on center. The rails measure 34" outside to outside, so I made cross marks 1-1/4" in from each side. I measured several times, then center punched & pilot-drilled the holes. After a few tool malfunctions with my holes saw (don't ask), I managed to get both pin holes drilled. Rolled the cross member under the rails, & jacked it up into place. Whaddayaknow? The pins popped right into position. I love it when a plan comes together. Enjoy the pics... hopefully tomorrow I can get the tubes in position...
From what I can tell, with the engine & body back on, it should droop about another 2"... Nice!

Ok, so haven't gotten much done lately. Had to go out of town for a few weddings combined with a vacation, so rusty's been in mothballs. Good thing is that I got the engine & trans slid in there. Fits nice - actually I can fit my entire fist between the block & the firewall, with room to spare. Need to get back to it, but find it hard to get motivated when it's hot as heck and the vaca was in nice, cool weather. Ugh. Better start riding the bike to get over the heat - sounds crazy but it works. Anyway, now I'm having second thoughts on the engine/trans combo. Any of you read carcrafter22's buildup on fte? Well, I'm going to look at an isuzu truck with the same 3.9 turbo diesel engine. Better mileage, future-proof (diesels were originally designed to run on veggie oil, and that'll be around as long as we are) and both of those make my inner tree hugger happy. The whole truck is ridiculously cheap, so it's hard to pass up. I won't make my choice til I've driven the diesel tomorrow. Any thoughts/opinions?
Rooting around on another site & came across a great idea for the mounting of the rear of the lower control arms... thought I'd share and save the link here for my own future use. ;o)
http://www.fordification.com/forum/view ... c&start=45
Scroll down about half way & see how he documented using another pair of trailing arm brackets with the bushings cut off to weld to the frame... thinking I may do the same, since the cast iron in-frame brackets don't look like they'd be too easy to weld to the frame....
At least I've never tried to weld cast iron to a steel frame rail - what do you think? Is that an option or a death wish?
-
64shortbed
- Posts: 291
- Joined: April 15, 2010, 12:25 am
- Location: Paso Robles, Ca
Haven't ruled iit out forever, but the seller flaked on me! So for now I'm moving forward with the 4.6 sitting in it now.
My wife's a teacher which means we're on the summer holidays - that's why I'm moving at a snail's pace at the moment.
But I'm going to look at a cab donor today before I meet with a new customer. Wish me luck on both!
My wife's a teacher which means we're on the summer holidays - that's why I'm moving at a snail's pace at the moment.
But I'm going to look at a cab donor today before I meet with a new customer. Wish me luck on both!
Ok, so the donor is titled as a '64 but was a '65 model, twin I beam, etc. Oh well. Anyone interested in a solid '65 cab with the rest of the truck wasted around it? LOL?
Actually, while the bed floor was swiss cheese, the sides looked good. The psgr door was tweaked, but drivers was solid. Hood looked good as was what I could see of the inner fenders & core support (there were yellow jackets all over it so I didn't look to close. Oh yeah, it's a custom cab too.
It's on Sarasota's CL for $1k obo. Bet he'd take $400.
Hey guys! It's been quite a while since I've worked on old Rusty. This is where I left off when I stopped - front end mocked in, engine & trans in, up on skates & pushed aside for storage.

I got out there last week, pulled the engine & tranny back out, slid out the front end, and got ready to tackle the evil rivets! I hate these things. Center punched, drilled with a small bit, then again with a larger bit until I took the heads off, then beat the hades out of the brackets to get 'em off. Fun!

In the process of the beating, shower of rusty metal bits came out of the lower cowl & cab mount. Yes, that's the floor you can see through the cowl & cab mount!

After lunch I was getting ready to do the same to the passenger side when I managed to knock over a bucket holding the antifreeze from when I pulled the 302. GRRR!!! Of course it went UNDER everything and all over the door mats leading into the house, so I then spent the next 2 hours moving & cleaning up the mess! I could've just wiped up the worst of it & left the rest to dry, but the dogs are dumb enough to lick the garage floor without the "sweet" antifreeze to tempt them. Better to clean up then deal with sick dogs. Now I've got the fan blowing on the floor to dry the last of the water I used to rinse/mop up the mess... Hopefully more to report tomorrow!
I got out there last week, pulled the engine & tranny back out, slid out the front end, and got ready to tackle the evil rivets! I hate these things. Center punched, drilled with a small bit, then again with a larger bit until I took the heads off, then beat the hades out of the brackets to get 'em off. Fun!
In the process of the beating, shower of rusty metal bits came out of the lower cowl & cab mount. Yes, that's the floor you can see through the cowl & cab mount!
After lunch I was getting ready to do the same to the passenger side when I managed to knock over a bucket holding the antifreeze from when I pulled the 302. GRRR!!! Of course it went UNDER everything and all over the door mats leading into the house, so I then spent the next 2 hours moving & cleaning up the mess! I could've just wiped up the worst of it & left the rest to dry, but the dogs are dumb enough to lick the garage floor without the "sweet" antifreeze to tempt them. Better to clean up then deal with sick dogs. Now I've got the fan blowing on the floor to dry the last of the water I used to rinse/mop up the mess... Hopefully more to report tomorrow!
-
Alan Mclennan

- Posts: 9324
- Joined: October 14, 2006, 6:16 pm
- Location: In the shed... Cranebrook NSW

Honey, If I say I`ll fix something I will, there`s no need to remind me every 6 months!!
66 f100 tabletop swb 351 Clevo C6 "Beryl"
Slick Stock 3 KCMO
Slick Stock 4 Altoona
Slick Stock 5 KCMO
Slick Stock 6 Altoona
Slick Stock 7 Salina KS
Slick Stock 8..............................
66 f100 tabletop swb 351 Clevo C6 "Beryl"
Slick Stock 3 KCMO
Slick Stock 4 Altoona
Slick Stock 5 KCMO
Slick Stock 6 Altoona
Slick Stock 7 Salina KS
Slick Stock 8..............................
-
64shortbed
- Posts: 291
- Joined: April 15, 2010, 12:25 am
- Location: Paso Robles, Ca
I too am a member of the "spill (insert automotive fluid here) all over the garage floor" club. I dumped the entire contents of the lawn mower's crankcase in the garage just last month.
Good thing you're handy with a welder. By the looks of that cab, you may be welding a lot if you cannot find another.
Good thing you're handy with a welder. By the looks of that cab, you may be welding a lot if you cannot find another.
-don
'64 F100 262-I6
'64 F100 262-I6