Page 2 of 6
Re: 64 Tweety Bird
Posted: September 29, 2012, 6:49 pm
by rickairmedic
Dang that one may require welding goggles just to drive it

thats some BRIGHT Yeller .
Rick
Re: 64 Tweety Bird
Posted: September 30, 2012, 3:57 pm
by twall64
Daryl that's looking fantastic
Re: 64 Tweety Bird
Posted: September 30, 2012, 6:23 pm
by bird55
Like the simple way you relocated the bracing to the inside of cab. Smart and clean.
Re: 64 Tweety Bird
Posted: October 20, 2012, 5:40 pm
by Uncle Skip
Well, my boy Daryl got some serious progress done. The interior, window and door jambs are painted, and the firewall is finally finished. Dudes and dudettes, this is a yellow truck.
So BroncoTom and I went by today and helped put the cab back on the body mounts and mount up the power brake booster. After BT went home, we started planning and laying out the Eazy Wire fuse block and wires. Should be a fairly straight forward installation. Stay tuned.


Re: 64 Tweety Bird
Posted: October 20, 2012, 6:44 pm
by MadMaxetc
Looking good!
Re: 64 Tweety Bird
Posted: October 22, 2012, 11:23 am
by twall64
looks great
Re: 64 Tweety Bird
Posted: October 23, 2012, 9:03 pm
by totten
Are you going too two-tone the yellow with another color on the truck? Nice work.
Re: 64 Tweety Bird
Posted: October 23, 2012, 9:07 pm
by Harper
Looks Great!!
what brake booster is that? I like! might get me one if its not to awful expensive.
Re: 64 Tweety Bird
Posted: October 28, 2012, 7:02 pm
by Uncle Skip
Daryl just sent these.
Inner fenders will be done when he color sands and buffs them. Now we can mount the core support and inners and start making some real progress.
Looks like I need to get to work on my own truck or he'll be driving before I do.


Re: 64 Tweety Bird
Posted: December 2, 2012, 6:25 pm
by Uncle Skip
More progress on Tweety.
Remember the original top replacement?
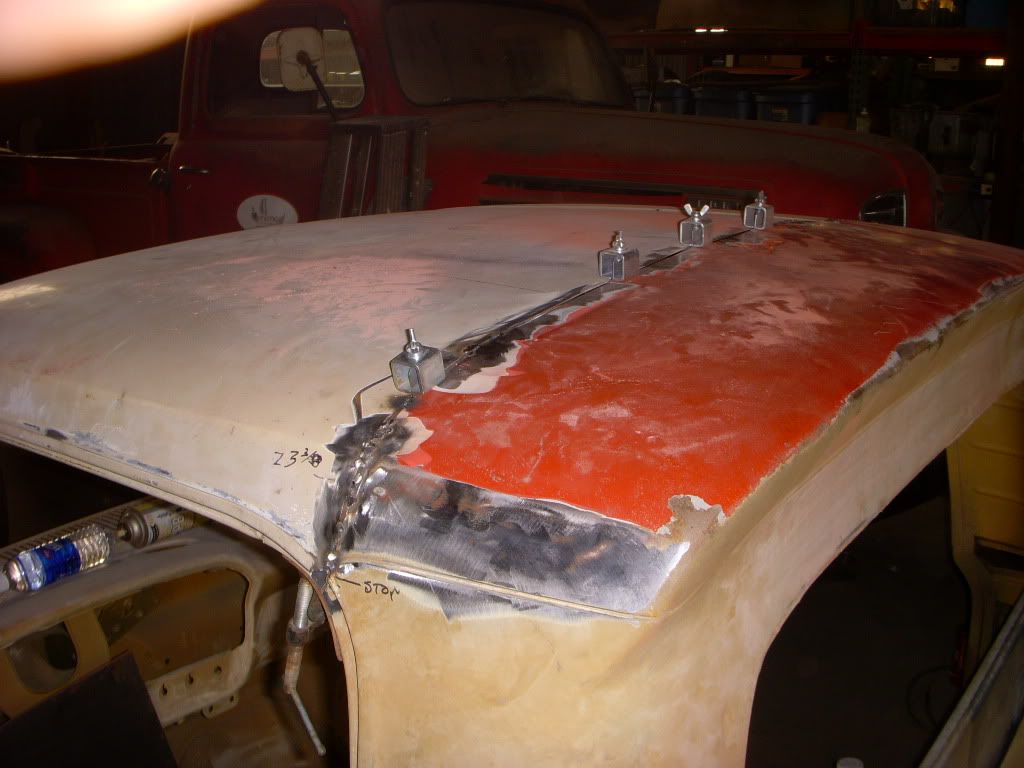
Here is the final product just waiting to be buffed out.

Mounted the fuse block with the riv-nut tool. Way cool.

And the thru-firewall grommets for the under hood wiring.

Finally, some more bling. Billet aluminum pulleys and brackets for the front of the motor. Pretty for sure, but it's going to take a lot of upkeep on this puppy to keep things clean and shiny.


Re: 64 Tweety Bird
Posted: December 5, 2012, 10:53 am
by slickmainer
i need that wiring as well.
Re: 64 Tweety Bird
Posted: December 9, 2012, 3:34 pm
by Uncle Skip
More progress from Daryl.
The Tweety dash with billet insert. The color is a really sweet brown that has been matched with the vinyl on the upholstery.

Re: 64 Tweety Bird
Posted: December 9, 2012, 7:21 pm
by Uncle Skip
Give a man a rainy day and some new goodies and this is what you get. More motor bling. Polished A/C compressor went on today.
Nice work Daryl. We'll plumb the brakes in the next week or so when you get the brackets and clamps in.

Re: 64 Tweety Bird
Posted: December 17, 2012, 8:08 pm
by Uncle Skip
Daryl got the dash polished up and installed the custom stainless A/C vent covers while I was diddling around in beautiful Ft Worth at my wife's family reunion.
Some people have all the fun; it sucks being me.
There is going to be a lot of thrashing on this truck over the Christmas Holidays. A lot of small, aggravating, piddling, minor shit details that have to be done even if you hate to do them kind of chores.
But now is the time to do them while everything is out in the open and accessible.
?Tweety gets done in '13?
Stay tuned.
Merry Christmas everyone.

Re: 64 Tweety Bird
Posted: December 21, 2012, 8:22 pm
by Uncle Skip
Daryl and I got some more stuff done today on Tweety. Mounted the power steering pump and some other mechanical stuff, but the real fun was installing the Vintage Air evaporator unit. We drilled, dimpled, and welded in 10-32 counter sunk screws in the top of the dash and firewall to use as studs for the A/C mounting brackets before he painted the truck. Resulted in a very solid, stable instillation for the evaporator unit. I have no clue how people mount this unit without doing that. Got the ducting installed on the windshield defroster vents and pre-routed the heater hoses too and we planned out the location of the cab A/C vents.
*Make sure you account for the ducting and hoses that go into the top of the evaporator unit.

Daryl is turning into a Slickster Extraordinaire. He does the work, I provide the adult supervision.... at least that's what Janet says

Re: 64 Tweety Bird
Posted: December 21, 2012, 10:16 pm
by Lee's 64
WOW! I've never been a big fan of yellow. But I have to say........"That's pretty dang Tweet!" Where u get dash panel? I like it!
Re: 64 Tweety Bird
Posted: December 23, 2012, 4:59 pm
by Uncle Skip
Lee
The billet insert came from Junkyard Dog, aka Just Tom at Flashback F100's. As did the gauges.
Used the dash panel from a round speedometer truck and cut it out to fit the new gauges.
Give him a call.
Re: 64 Tweety Bird
Posted: December 27, 2012, 5:58 pm
by Uncle Skip
Cold rainy Thursday in Houston. Perfect day to work on a Slick. Mounted the new core support and inner fenders to pre-route the heater and A/C hoses and plan out the plumbing on the stainless brake lines so everything clears.
Now its cut, flare and fit time.


Re: 64 Tweety Bird
Posted: December 27, 2012, 9:28 pm
by Max
Nice work on the defrost vents and nice to see the core support is black. Will look good through the grille (not that there is anything wrong with Mac's fine left driving machine).
Re: 64 Tweety Bird
Posted: January 13, 2013, 7:53 pm
by Daryl
Polished the cab today and wet sanding it to 2500. It's a bitch when you find minor places that don't measur eup to what I am wanting this to be. Found a couple of places I have to touch up with paint and even found a area I didn't have enough clear on. SO I am going to have to do some touch up. You guys have to remember I have never done this before, but I am going to win. Never did body work or painted before, so I am always in a learning cruve.
On the top of the cab I did not sand enough with the final two or three grits and had to resand to get it where I wanted it. It isi looking pretty good, when I get the tights places polished I will post pictures.


